Wednesday, August 20, 2014
Watermelon Nails
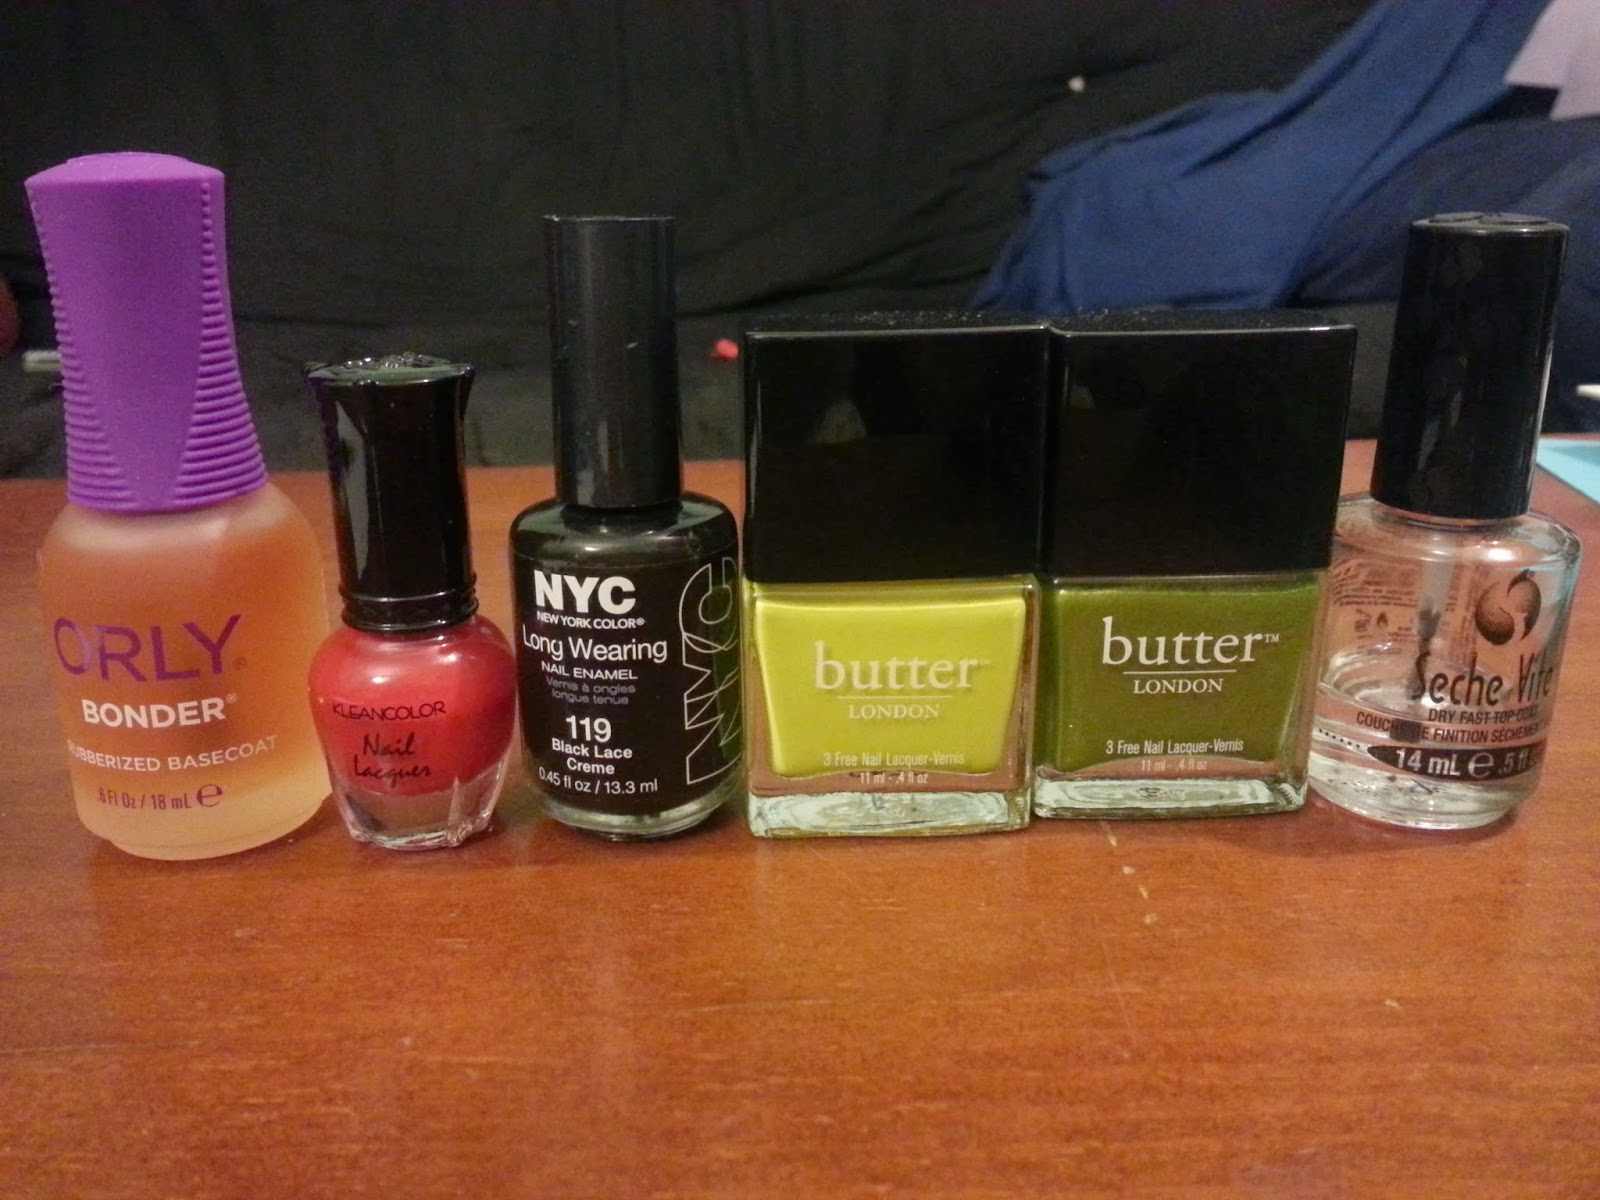
I scored my very first Butter London Nail Lacquers very on sale at TJMaxx recently. I picked up the colors Dosh - an olive green with shimmer & Wellies - a yellow green creme. When my boyfriend saw them, he suggested that I do a watermelon mani and use these to make the rind. Of course, I took his advice! Here are the polishes I started out with:
Here is the final list of everything I used to make this mani:
Base Coat: Orly Bonder
Polishes: Butter London - Dosh
Butter London - Wellies
Klean Color - Red
NYC - Black Lace Creme
(later added ELF - Flirty Fuchsia)
Tools: Extra small dotting tool
Small square nail art brush
Triangular makeup sponge
Top Coat: Seche Vite (later decided to mattify with NYC Matte Me Crazy)
I started out as usual, with my base coat of Orly Bonder. Then, I put my base colors on. The Butter London in Dosh went on my thumb, pointer and pinky, while the Klean Color went on my middle and ring fingers.
To make the rind pattern, I used a small square nail art brush (from my Bundle Monster Kit):
I dipped this in the Butter London in Wellies and started pressing down the tip of the brush in a zig-zag pattern along the length of my nail. Then, I went over a second time using the same process, but making the zig-zags a little less defined.
For the watermelon seeds, I used this tiny dotting tool (also from my Bundle Monster Kit) dipped in the NYC polish.
I tried to make the seeds wider on one end and taper to a point, but they didn't come out all that cleanly.
Finally, I decided that the mani would look better with a matte top coat, so I covered everything with NYC Matte Me Crazy.
I wore this for a day before deciding that the red was too red for watermelon. So, I sponged some of the ELF Flirty Fuchsia over the top of the middle nails and topped again with NYC Matte Me Crazy. Here is the final result!
Saturday, August 16, 2014
Nail Stamping on a Friend
Yesterday, my co-worker and I took a break from work so I could practice some of my nail art on her. She is a very willing subject! She chose a stamping mani since it was relatively quick and easy, which was fine with me because I need to practice with my new set.
Here are the supplies I used:
Base coat: Orly Bonder
Polish: Jordana - Ice
Julep - Fiore
Supplies: Konad Stamping Kit
Pueen Stamping Plates
Top coat: Seche Vite
I used two coats of the Jordana, which I think I have had for about 7 years now, but it's still going strong! Then, I stamped using the Julep color. I used the single flower pattern pictured above for the fingers, and then a different flower pattern for the thumbs. Then, I topped it off with the trusty Seche Vite. Here is the final result:
I really liked the color combo, and besides a little bit of smudging on the stamping, it came out looking really great!
Birchbox August 2014
This review is for the Birchbox from August 2014. Birchbox is a very popular subscription box. It is $10/month for 4-5 beauty and lifestyle samples, which are personalized based on a quiz you take. They seem to stick to the quiz fairly well, though they do state that even if you "dislike" a particular product, you may still get it once a year or so. The great thing about Birchbox is its reward system. You get 10 points for every item you review from your box, as well as a point for every dollar you spend in the Birchbox shop (which includes the purchase of your actual box). You can also get points for referring friends. Every 100 points you accumulate is $10 toward a purchase from the shop, which contains full-sized items, some of which are exclusive to Birchbox. So, it's a pretty inexpensive way to try out products and then use your rewards towards buying the ones you ended up liking or something else entirely.
I received this box on August 9th and it is my third Birchbox. They send out the boxes in waves depending on what you are getting, but it's generally pretty early in the month. Here is the box as it looks upon arrival:
When you open the outer shipping box, there is another cardboard box inside. I keep these because they are perfect as gift boxes. This is what it looks like already opened up. The card discusses the theme for the month, which was "not taking yourself too seriously".
Here is the description card showing what I received and the value of the full-sized versions of the products:
I have also typed out the list with links to the actual items either on Amazon or Birchbox:
amika Perk Up Dry Shampoo
Cailyn Cosmetics Dizzolv'It Makeup Melt Cleansing Balm
Harvey Prince Ageless Body Creme
Marcelle BB Cream Golden Glow
theBalm Stainiac
And here are all the items nicely packed in the box!
Since I have had this box for a week, I have had the chance to try out some of these products and hopefully provide a better review. The first item up on the list is the amika dry shampoo.
I have never tried dry shampoo before, though it has been on my list of things to get. I usually go as long as possible without washing my hair to prevent it from getting really frizzy, and I prefer to do co-washing rather than using shampoo, so dry shampoo would be perfect for refreshing between washes. I tried this out on an evening where my hair hadn't been washed in a few days and my roots were getting a little greasy. I just sprayed a little bit onto my roots from about 12 inches away, ran my fingers through to distribute it, and put my hair up overnight. In the morning, my roots looked pretty refreshed without being dried out, which was great. I was a little concerned with alcohol being a main ingredient, but it ended up looking very natural. This product is definitely a candidate for buying with my birchbox points.
The next product I looked at was the Cailyn Cleansing Balm.
This sample is a pretty good size for sampling, as it is enough to patch test for a couple weeks or use on your full face a few times. I did not try it myself, as my skin is very picky about cleansers. I will probably find someone to give this away to. It looks like it has a nice creamy texture and has a pleasant smell.
Up next is the Harvey Prince Body Cream.
The formula for this is very nice, as long as you don't have any sensitivities to coconut oil (which can cause reactions in some people). It's quite a small sample, so I used it a couple times on my elbows, which get pretty dry. The smell was very nice and lingered for awhile and it was definitely moisturizing. If I was more diligent about using body lotion, this would be a candidate for purchase as well.
Finally, we come to the samples inside the pillow pack. Here is the Marcelle BB Cream:
As you can see, it is a tiny tiny sample. Also, it only comes in one color, which is a scary idea for someone with fair skin. It is quite glittery and doesn't appear to have very good coverage, though it also isn't outrageously dark. I can see myself using this on top of my base foundation/BB cream for extra glow or as a highlighter.
The pillow pack also contained theBalm Stainiac sample in the shade Beauty Queen.
This is the one sample I chose to have in my box, since I am intrigued by products you can use both on the lips and cheeks. I also like stains because I prefer not to reapply any of my makeup during the day. The color is a very mild pinkish color, which turns out to be a "my lips but better" sort of shade on me. I wore it one day to work as a lip stain and it survived until around lunch time, when it started to fade. The application was a little patchy, but I could chalk that up to my own skills. I have not had the courage to try it on my cheeks yet as it seems like it would leave little room for mistakes.
I took a picture of swatches of theBalm Stainiac and the Marcelle BB Cream on my arm, as well as theBalm Stainiac applied onto my lips.
I did enjoy most of the products in this box, and the rewards program is hard to beat, so I think I will be sticking with Birchbox for now. I received a coupon code for my 3 box anniversary, and I have racked up about 200 points, so I think it's time to do a little shopping!
Tuesday, August 12, 2014
Caviar Bead Nails
While searching for good deals at my local TJMaxx, I discovered a bunch of Ciate caviar manicure kits for $10. I figured I would get one to try out since I don't have any caviar beads in my nail art collection, so I got the cotton candy set. The set comes with a base polish, a container of caviar beads, a plastic tray, and a small black funnel. The instructions specify to apply the beads to the provided base polish, but I wanted a different look, so I opted to try using a different polish. Here are the supplies I used for this manicure:
Base coat: Orly Bonder
Polish: Ruffian Nail Lacquer - Rosary
Supplies: Caviar Beads from Ciate Cotton Candy Set
Top coat: Seche Vite
I started out by removing my previous nail polish and getting my nails filed/cleaned up. Then, I applied a coat of Orly Bonder.
Next, I applied a single thin coat of Ruffian Nail Lacquer in Rosary (which I got as a Birchbox sample in July). It only took a single coat to be opaque and was very easy to apply without looking streaky, which many metallic polishes seem to have issues with.
I chose to do caviar beads only on my thumb and ring finger as accent nails. Instead of following the instructions enclosed with the kit, which says to use a second coat of their provided base polish, I applied a coat of Seche Vite top coat and then followed the instructions from there. I poured a good helping of beads directly onto my nail over the provided plastic tray.
Then, I pressed the beads down with my finger to set them into the polish, brushing away the extras. They looked pretty nice directly after application. I also applied a coat of Seche Vite to the rest of my nails.
Then, I undertook the task of putting the extra beads back into the bottle.
These things bounce everywhere! I would recommend guiding them from the tray to the funnel with your finger rather than pouring directly to minimize mess. I think I will be stepping on tiny beads for awhile.
After this ordeal, I followed the instructions and allowed everything to dry for at least 30 minutes, occupying myself by playing games on my phone. Before bed and even directly after waking up, they still looked pretty nice and seemed to be stuck. However, as I got ready this morning, I was shedding beads left and right. They just kept popping off, particularly around the edges. Here is what they looked like around noon:
Next time I try these out, I will use the base coat that came with the kit, though it doesn't seem to be special in any way. Also, I can try sealing the edges in with top coat once the caviar beads set and the polish dries. I hope I can get it to work better, since the beads looked so nice right after application! Overall, they seem to be a little bit more trouble than they are worth.
UPDATE:
I decided to get rid of the caviar beads and salvage the rest of the mani with some stamping using a Konad kit and Pueen stamping plates:
I picked a nice flower design and used NYC Long Wearing Nail Enamel in Black Lace Cream to stamp. Much better!
Saturday, August 9, 2014
Wantable Intimates July 2014
This review is for the Wantable Intimates box from July 2014. This box is $36/month for 4 to 5 "intimate" items, which include underwear, bras, leggings, tights, pajamas, socks, and more. You fill out a fairly detailed quiz about your preferences and they stick to it pretty well. You can skip any month and also return the whole box for free if you don't end up liking it. I have had a subscription since May 2014 and would be happy to share a referral if you are interested in getting a subscription. Wantable also does a monthly make-up box with full-sized products and an accessories box.
My July box should have shipped around July 22nd, but it got delayed. I contacted customer service about it and they apologized for the delay, shipped it the next day, and gave me a $10 credit to use. I've always heard good things about their customer service, and this just confirmed it!
Here is the box as received and first opened. I think they accidentally put the wrong insert in because it was shipped in August.
Here is a picture of the page detailing the items in the box. First is my preferences. I didn't really say no to a lot of things except socks & panties, since I already have plenty, and accessories & shapewear, since I don't have much interest in those items. The next picture shows everything I received in this box and the retail values.
Here are the items in the order that I unpacked them. First, the lacy camisole from Honeydew.
This is a very nice color and feels very soft and satiny. It fits a little on the tighter side and has adjustable straps. This will be very comfortable (and sexy feeling!) to wear to bed, though I don't think it's something I would have purchased for myself, particularly at a retail value of $24.
Next, I have the lace trimmed bralette, also from Honeydew.
I am a huge fan of soft bras. They are just so comfortable, even for everyday use! This is the third soft bra I have received from Wantable, and I have been a fan so far. This particular bra is supposed to run small, so they sent a size larger than I put in my survey, and I am glad they did.The color doesn't come through well in the picture, but it's a pretty deep purple. I like the fact that it doesn't have a clasp and just slips over your head.
The third item is a pair of fishnet tights from Isadora.
They aren't the traditional fishnet pattern, but rather stripes with different netting patterns. These are one size fits all, so they are definitely stretchy and go up pretty high on the waist if you don't want them bunching. Also, you have to be careful to line up the stripes nicely or it looks a little weird. I like the idea of patterned tights, but don't wear them that often. Hopefully, I can come up with a good outfit to pair these with.
The final item is also from Isadora and is a pair of patterned leggings.
I also love leggings, so this was a welcome addition to the box. These are super soft and very comfortable. I will probably wear them for lounging around the house or to liven up a plain dress or long shirt. I often wear leggings to work out, but these feel much too fancy for that.
Overall, I enjoyed this box, but I think it will be the end of my Wantable accessories subscription. I think that I could take this same amount of money and buy myself some suitable "intimates" that are less expensive. Still, I am glad that I acquired some quality clothing over the past few months. Also, maybe it's because I started my subscription very late in the month, but I never get any of the "featured" brands that they discuss on the website and on my packing slip. If you are interested in this box, I would recommend starting early in the month and being very specific and honest with your preferences. I hope this review was useful, and here are some bonus bunny butts!
Monday, August 4, 2014
Collection of Nail Art So Far
Here is a bunch of pictures of nail art I have done so far (in a bit over a year). In the future, I plan on doing more step-by-step tutorials and explaining how to use the different tools and techniques. I definitely draw inspiration from other nail blogs and forums, so my ideas are not always original, and I am happy to give credit where it is due.
Interlocking dot nails done on a friend:
Striping tape sun-bursts:
Rainbow dotticure:
Love birds and cherry blossoms:
Glitter placement:
Color blocking:
Cracked top coat:
Halloween stripes:
Water marble:
Dot gradient (pre-cleanup) + grumpy bunny:
Glitter placement - complete nail:
Christmas nails:
Matte concentric rings:
Metallic interlocking dots (pre-cleanup)
Nail decals:
Rainbow neon drips:
Purple and gold tape mani:
Gradient tips:
Clear studs:
Monarch butterfly nails:
Concentric dots:
Little flowers:
Metallic stripes:
Cloud mani:
Dark floral stamping:
Heart decals on jelly:
Glitter stripes:
Subscribe to:
Posts (Atom)